.

.

Wednesday, June 27, 2012

Dull to Delightful!

So I am so happy to say that we are finally finished with not only the interior painting of our home but now the exterior and we could not be happier with the transformation. It is incredible how much a little yard work and some paint can transform your house and really add major curb appeal.

Now for the photos!

Our home when we purchased it in October 2011:

Here is our newly painted home now!!!

Does it look a little different? Just a bit!  Hopefully in a good way :) Here are just a few of the changes we made to the front of the house over the last few weeks!


Our previous entryway- October 2011

Entryway now:

Back of our house before:

And her it is now- LOVE the windows trimmed out it makes it look so much bigger!


Side of house before:
 And now:

Other Side before:

and after:

Terry and could not be happier about the new paint job on our house. It really does make it stand out in the neighborhood now and you actually notice it when you drive through. We are just so pleased with the new look. If anyone is interested our painter used Sherwin Williams Duration paint and the main blue color is called Distance- SW6243 and and the trim is called Classic Light Buff- SW0050.

Now its time for some much needed R&R! I think we will spend the rest of our summer kicking back out on our porch enjoying a few bottels of wine and hopefully some warmer weather!

Tuesday, June 19, 2012

The exterior house painting has finally begun!

W have been waiting all month to get nice weather so we could get the exterior of our home painted...and have not really had any but on Friday last week they were able to paint the body color on the entire house. I came home from work and was just SHOCKED at the transformation that was made to our home. They still have the trim to paint it looks amazing. Now I am just hoping that we have a dry day this week so they can paint the trim before our open house party this Saturday. They also have one more window to trim out. Here is a shot of the windows trimmed out. This is before the new paint job was done. The trim will eventually be painted an off white color. I was just shocked how much this adds to the house. It makes the windows look so much better and bigger. I am very excited to see it all completed. Hopefully next week I will reveal our freshly painted house!


Terry and I are just thrilled at the fact that we do not have any other painting projects planned for our house. At this point we are totally and completely painted out. Yes, we have accomplished a TON and transformed our house into a home of our own in just 7 short months! We would probably do it all over again (maybe not as quickly) but it feels so good to not have to be cleaning, taping & painting. Then getting paint all over our clothes, hair, skin. We are looking forward to not having to clean another paint brush, bucket or roller for a very long time to come! Looking forward to relaxing the rest of the summer and enjoying our house!

Cheers!

Friday, June 15, 2012

My thrifty June makeover

I have been on the hunt over the past few months for some new bar stools in our kitchen. The ones we inherited with the house I was not too fond of. They were very heavy and I didn't like the way they looked. See below shot of our old bar stools:


So last month I headed over to Habitat for Humanity and found these wonderful bar stools that would look fabulous in our newly painted kitchen. They were only $12 a piece and all they needed was some cleaning and a fresh coat of paint!


Last Sunday I scrubbed and sanded them down and added a new coat of white paint and this is how they now look in our kitchen.


Someday I have visions of painting the seat and back slats a red color to add a bit more red hints to our our kitchen...but for now I am totally and completely painted out and am looking forward to taking a break!

Thursday, June 14, 2012

From Purple Dragon to Dragon Slayer!

Remember when I first started this blog and we first started redoing our home...we started in the back in our master bedroom. I really wanted a purple bedroom (See this post) and I got one! (See below photo) I liked it and it was OK for a while...but then I started to kind of feel like it was a kids room. So our plan was to paint it something different after we finished everything else in our house.


So this past weekend we painted over the purple color and transformed it into a light grey. We also got the grey on super clearance at Home Depot. It was a color that someone made and didn't like so it was in their clearance bin. The great thing about it was that it was a high quality paint called Behr Premium Plus Ultra its one of those primer and paint all in one cans. I must say I was very impressed with this product. It went on very well! The first time we painted it we used the cheap Olympic paint and barely got by with one can and we really needed two gallon cans! On the Behr product we only used about half of a gallon can and only needed one coat! The other awesome thing is since we got it on clearance we got it for 35% off! So around $21. That made me very happy. Since the color was a made up light grey color, we don't know what its called....but I have decided to name it the "Dragon Slayer" Yes, I know I am a nerd! Anyways here is our bedroom now!!!


We really do like this color so much more. Its very calming and the best thing is that it feels more like an adult room now. :)

Tuesday, June 5, 2012

I'm Corky and you know it!


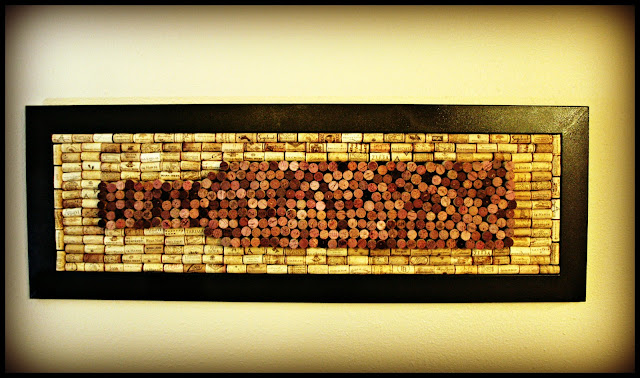
Our new wine cork wall art!


I am so excited about this quick two day project we just did! I have been seeing all sorts of fun things to make out of your old wine corks all over my favorite site Pinterest and since we are great lovers of the Vino and have been good about saving our corks over the last couple of years, I decided we MUST make one of these! So after counting up all of our saved corks...we only had about 150! We needed a lot more so I went out to our wine loving family and asked for donations of corks :) After a few months of hunting and gathering we compiled almost 1,000 corks and it was time to start in on the project!

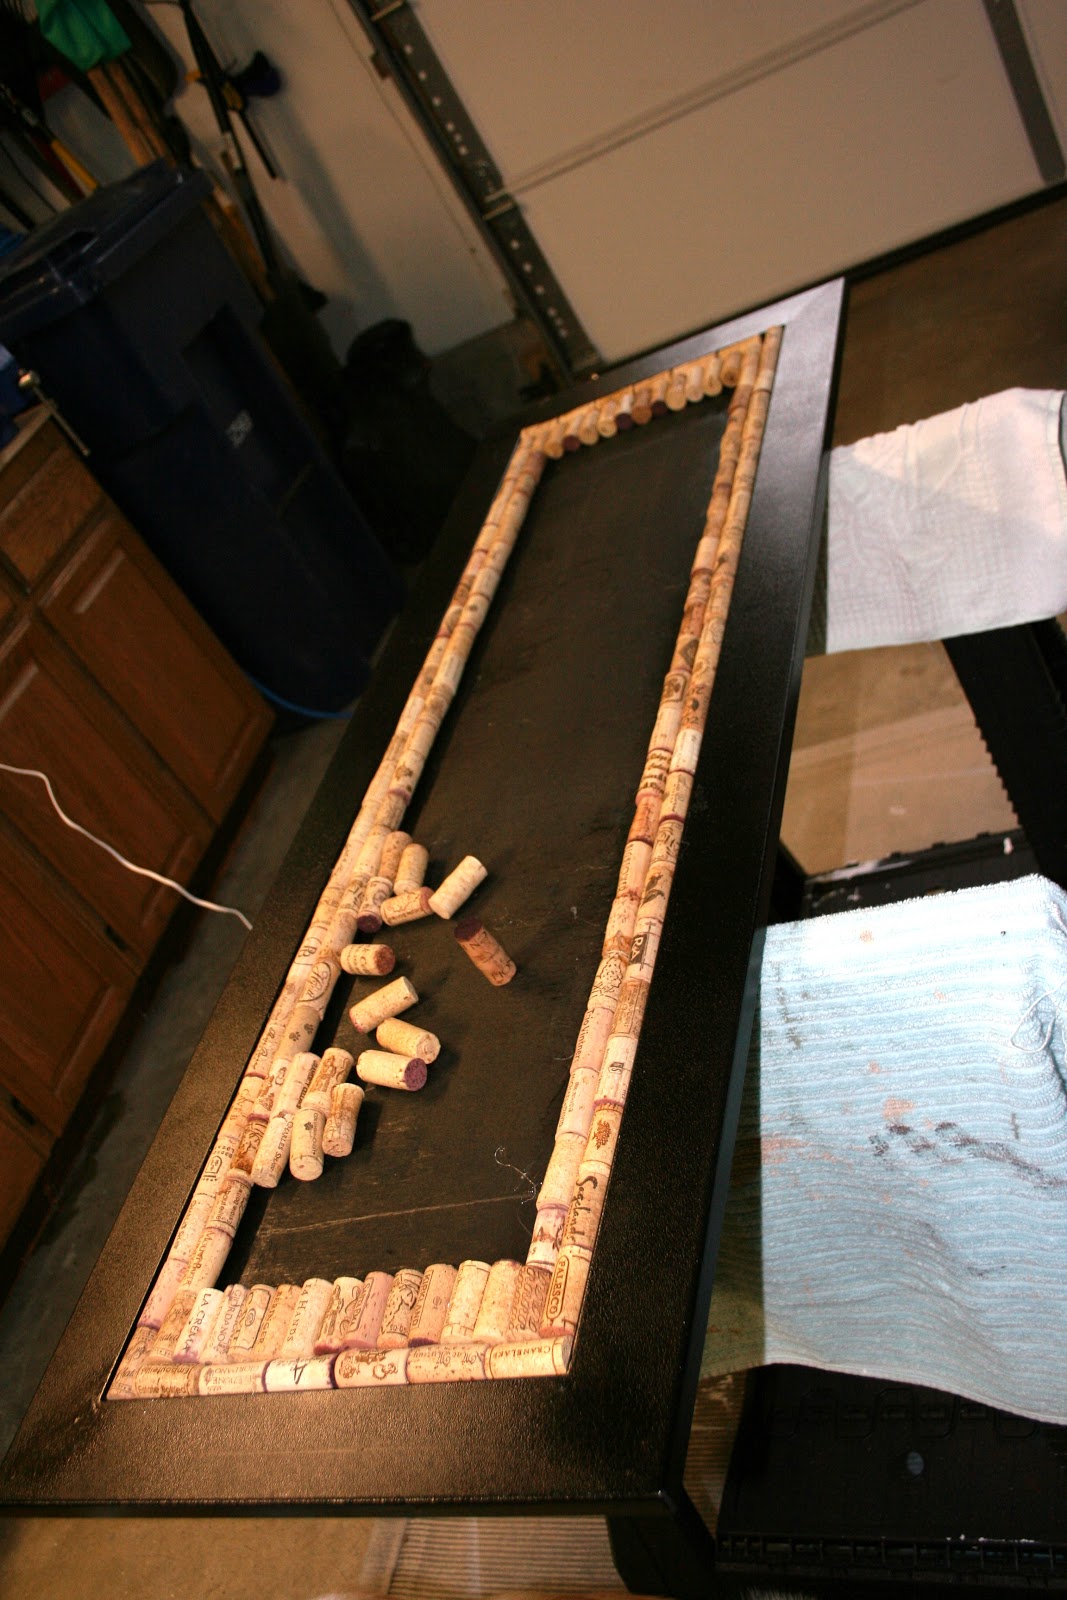
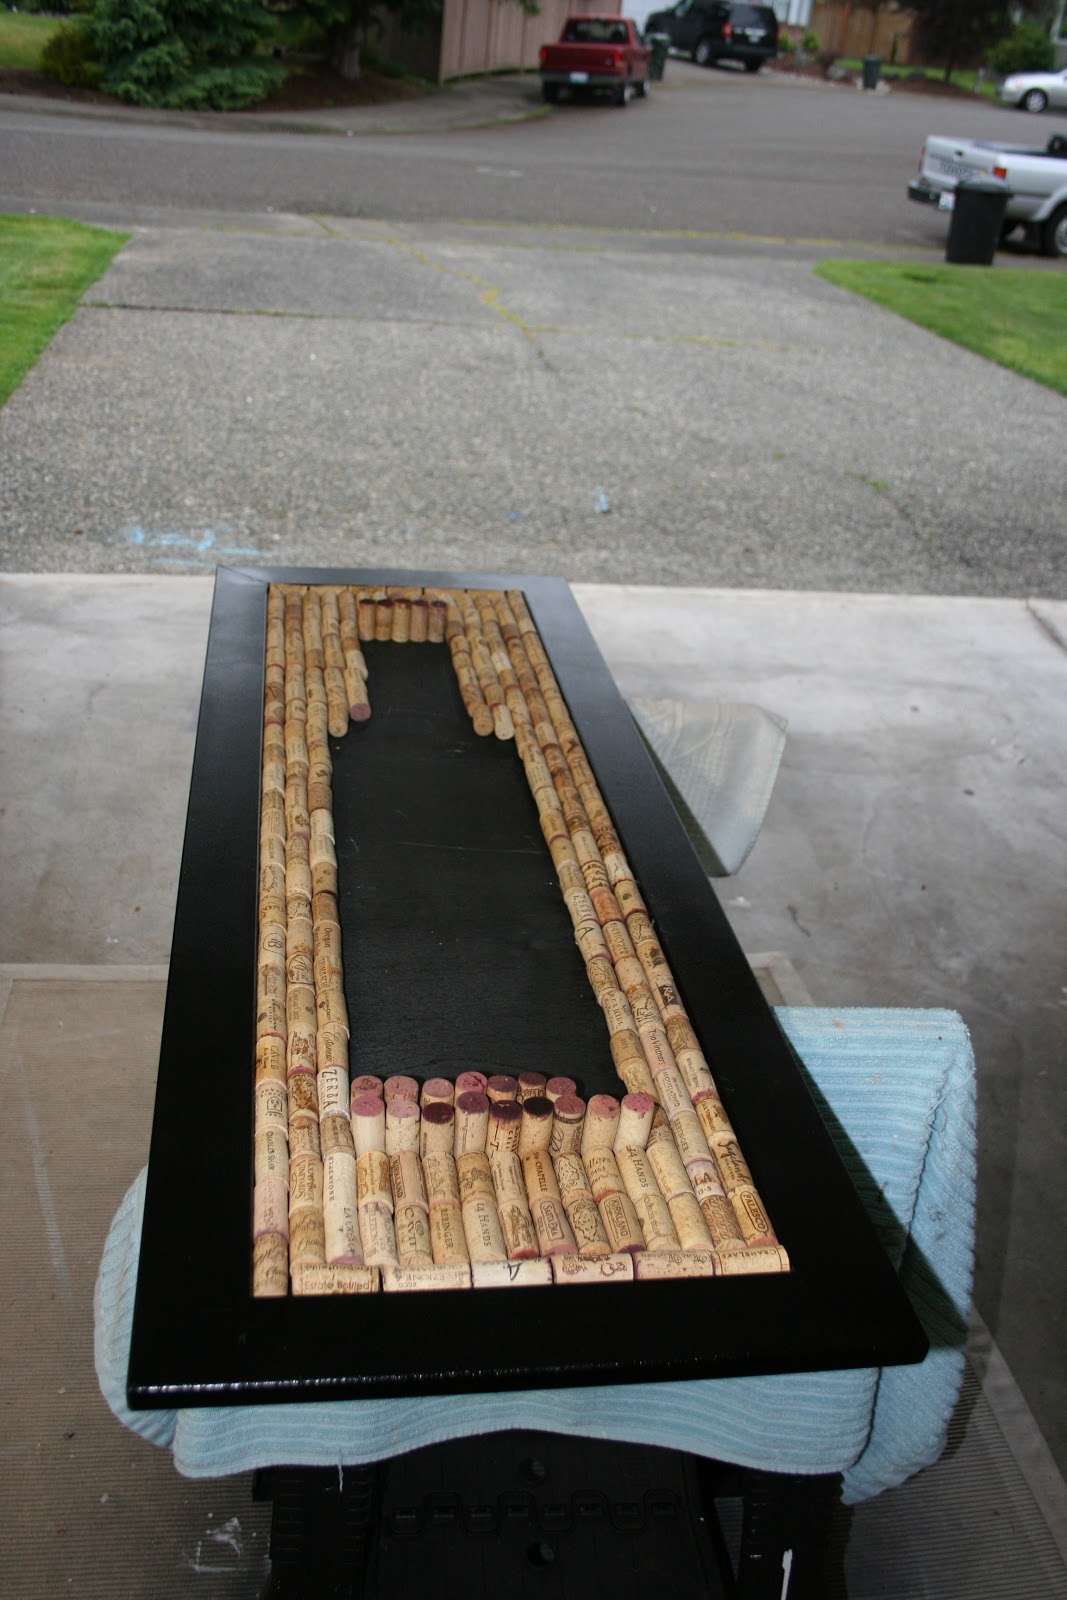
At first our plan was to do a heart out of wine corks but we really needed a larger piece above our TV and it needed to be longer and panoramic. So my clever husband came up with the idea of doing a wine bottle on laying its side! So Sunday night we started in on making the frame. The previous homeowner left us a nice piece of thin particle board that ended up working wonderfully for the back of the frame. We then started in on building the frame and went to Home Depot and bought an 8ft piece of primed MDF moulding for around $5! We went back to the house and Terry quickly built a frame out of it. The next day we applied a few coats of black spray paint. I wanted the corks to pop on the frame and thought the black would look very nice as well as match everything else in our house. I didn't get any shots of us building the actual frame- sorry...but below is finished frame spray painted. I believe the size of the frame was about 4ft by 2ft.


Here is our massive collection of corks! It doesn't look like a lot but their are around a thousand corks in there!

Then the hot gluing fun began! I also decided while doing this project, that I LOVE hot gluing! Getting the corks just right and lining them up took a little bit of shuffling around in the beginning but after I got them just right I started gluing away!


For the outline I decided that I wanted them all to lay flat. That way you can see all the different wineries and adds a bit more depth to the piece.


Filling in the wine bottle:


and here is the finished project!


We quickly hung it up in our living room and sat back and enjoyed a nice glass of wine while admiring our new piece of art! That cost us less around $5 (not counting all the bottles of wine we have consumed over the last few years ;) ) We are just in love with this piece and how it finishes off our family room! The red in the wine bottle brings the whole room together!


This was by far one of my favorite projects we have done in our house so far! It was quick, fun project and a lot easier than I thought it would be. A huge thank you to all of you who donated corks! (Leslie, Debbie, Amy, Burt & Nancy). I loved doing this so much that I have thought about making these on the side and selling or giving them away as gifts...I guess we will need to start drinking a bit more wine! ;)

Monday, June 4, 2012

Bold Bright Changes!

So I was going to wait to reveal our front door makeover until after our house was painted but I just couldnt. We have been a bit delayed because of the weather but it will hopefully it will be done in the coming weeks! SO while we have been waiting we decided we wanted to paint our front door before they painted the exterior of the house. So over Memorial Day weekend we transformed our front door and entryway from a dark and unwelcoming area to something bright fresh and new! Here is how the process went.

Here is how our front door looked before.


When we started in on this process we needed to give this door a good sanding. So after we removed the hardware. Terry had the fun job of sanding this sucker. It was just a little dusty!


Then he cleaned off the dust with some paint thinner and rubbed the de-glosser product onto the areas he couldn't get with the sander.

After that he caulked around the door waited for the to try over night and started the priming process the next day. I believe that we did 2 coats of the Zinsser oil based stain blocking primer. It was a huge transformation just priming the door white! Brightened it up a lot! 


We decided to paint our front door a light yellow color. I know some of you will absolutely hate it but we absolutely love it! We originally wanted to paint the door a red color but everyone is doing that nowdays. Don't get us wrong we love a good red door but we wanted to be different. We feel like our entryway is kind of dark to begin with and what better way to brighten it up than with a bright cheery yellow!

So here is how the door looks now! Please ignore the over painting and the missing shutters. Again we are painting the house so this will disappear. The house will soon be painted a dark blue with a white trim!


Front door before and after photos:


So stay tuned in the coming weeks for photos of our newly painted house as well as a few updates to the exterior that will make our home look much nicer too.  We are just so excited!
Related Posts Plugin for WordPress, Blogger...